The steps required to integrate OIM (11g PS1) and OIA (11.1.1.5) on weblogic (10.3.5)
1. Copy .jar files
Copy the following .jar files from
<$OIM_HOME>/designconsole/lib --------> <$OIA_HOME>/WEB-INF/lib
- xlAPI.jar
- xlCache.jar
- xlDataObjectBeans.jar
- xlDataObjects.jar
- xlScheduler.jar
- xlUtils.jar
- xlVO.jar
- oimclient.jar
- iam-platform-utils.jar
<$OIM_HOME>/server/lib --------> <$OIA_HOME>/WEB-INF/lib
- xlCrypto.jar
- wlXLSecurityProviders.jar
- xlAuthentication.jar
- xlLogger.jar
<$WLS_HOME>/server/lib --------> <$OIA_HOME>/WEB-INF/lib
- wlfullclient.jar
2. Alter configuration file: iam.context.xml
Within <$OIA_HOME>/WEB-INF directory, alter the iam.context.xml file with the following:
On line 21, change the following:
<!--<import resource="oim-commons-context.xml"/>-->
to...
<import resource="oim-commons-context.xml"/>
On line 23, change the following:
<!--<import resource="oim-11g-context.xml"/>-->
to...
<import resource="oim-11g-context.xml"/>
On lines 65-67, change the following:
<!--entry key="oracle">
<ref bean="oimSolution"/>
</entry-->
to...
<entry key="oracle">
<ref bean="oimSolution"/>
</entry>
Save and Exit
3. Alter configuration file: oim-11g-content.xml
To ensure you are using the OIM password encrypted instead of it being plaintext, you will need to alter the <$OIA_HOME>/OIA/WEB-INF/oim-11g-content file.
Note: my deployed WEB-INF is located within a OIA directory, this may differ to yours
On line 25-26 alter the following:
<property name="password" value="${oim.jdbc.password}"/>
<!--<property name="password" value="${oim.jdbc.password.encrypted}"/>-->
to...
<!--<property name="password" value="${oim.jdbc.password}"/<--<
<property name="password" value="${oim.jdbc.password.encrypted}"/<
Save and Exit
(It is worth stopping your application server and restart this after step 6)
4. Determine the OIM database properties

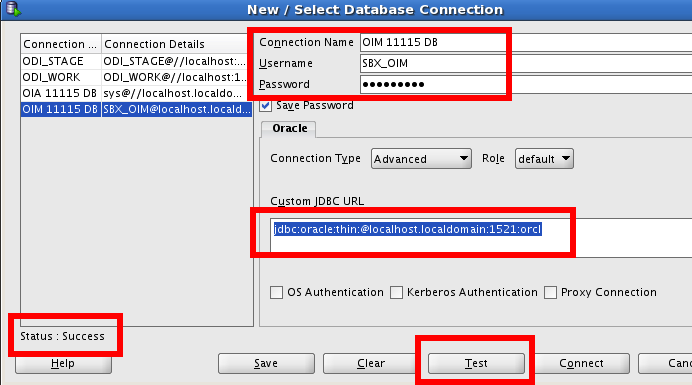
For step 5, you are required to determine the URL, Schema username and the password of the OIM database repository. The I used sqldeveloper to determine the correct jdbc connection is correct (saves coming into issues later). You must ensure the listener is up and running as well as knowing the following information:
Oracle Service Name: How to find out the Oracle service name
OIM Schema Username: Example of the configuration summary
5. Altering the oimjdbc.properties file
You are now required to configure the OIM JDBC information within the oimjdbc.properties file. You are required to know the following:
- OIM database username (oim.jdbc.username)
- Password for the OIM database
- The OIM JDBC URL string (oim.jdbc.url), used in the example above
Locate the <$OIA_HOME>/conf/oimjdbc.properties file and alter the following:
from...
# OIM user credentials
oim.jdbc.username=oimdbuser
# For encrypting the password read the documentation and running of the
# vaau-commons-codec.2.0.jar utility
# uncomment either the oim.jdbc.password.encrypted or oim.jdbc.password
#oim.jdbc.password.encrypted=d83970156ba26d0095865ef757bf7731
#oim.jdbc.password=oimpassword
oim.jdbc.url=jdbc:oracle:thin:@$SERVER_NAME:$PORT:oim
oim.jdbc.driverClassName=oracle.jdbc.OracleDriver
to...
# OIM user credentials
oim.jdbc.username=SBX_OIM
# For encrypting the password read the documentation and running of the
# vaau-commons-codec.2.0.jar utility
# uncomment either the oim.jdbc.password.encrypted or oim.jdbc.password
#oim.jdbc.password.encrypted=d83970156ba26d0095865ef757bf7731
oim.jdbc.password=Password1
oim.jdbc.url=jdbc:oracle:thin:@localhost.localdomain:1521:orcl
oim.jdbc.driverClassName=oracle.jdbc.OracleDriver
Within this example, the oim.jdbc.url , oim.jdbc.username and oim.jdbc.password were altered. The oim.jdbc.password became active (delete the '#' symbol).
6. Running the OIA Property Encryption Utility of OIM
You have already executed the OIA encryption utility when you followed my other awesome post on 'HOW TO: Install OIA 11.1.1.5'. You will need to do this again, though specifically for the OIM password encryption located within the oimjdbc.properties file.
The goal is to automatically remove the oim.jdbc.password string and replace it with an encrypted version (oim.jdbc.password.encrypted).
Firstly, make sure you are within the <$OIA_HOME>/conf directory
Secondly, you will need to execute the following command:
/home/oracle/Oracle/Middleware/jdk160_24/bin/java -jar ../OIA/WEB-INF/lib/vaau-commons-crypt.jar -encryptProperty -cipherKeyProperties ./cipherKey.properties -propertyFile ./oimjdbc.properties -propertyName oim.jdbc.password
It is likely that you'll need to change some of the following:
- Ensure you're pointing to your deployed JDK java file in order to execute the command
Replace my path '/home/oracle/Oracle/Middleware/jdk160_24/bin/java' with your path.
- Alter the '../OIA/WEB-INF/lib/vaau-commons-crypt.jar' string.
Ensuring it's pointing to your vaau_commons-crypt.jar file.
Assuming you executed this correctly, you will be able to view the alteration within the oimjdbc.properties file.
Within my environment, my oim.jdbc.password.encrypted sting has appeared with a long alphanumeric value (aka the cipher text).
Replace my path '/home/oracle/Oracle/Middleware/jdk160_24/bin/java' with your path.
Ensuring it's pointing to your vaau_commons-crypt.jar file.
7. OIA GUI Configurations
Restart the OIA and OIM app servers and ensure they are up and running.
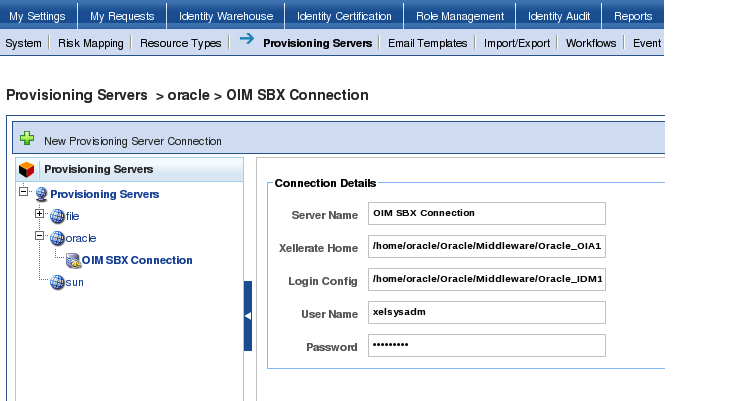
The next stage will be to setup the GUI configuration within OIA. This is completed by logging into OIA and going to Administation --> Provisioning Servers --> New Provisioning Server Connection
From the drop down list, select the type of provisioning server connection = Oracle. Click Next.

Enter in the following:
- Connection Name= OIM SBX Connection
- Xellerate Home = The path to your local xellerate folder ( Mine is: /home/oracle/Oracle/Middleware/Oracle_OIA11115/xellerate)
- Login Config = The path to the authwl.conf file
( Mine is: /home/oracle/Oracle/Middleware/Oracle_OIA11115/xellerate/config/authwl.conf) - User Name = xelsysadm
- Password = The xelsysadm password
In this example I copied over the conf directory from the <OIM_HOME>/designconsole path into a newly created directory called <OIM_HOME>/xellerate to use as the configuation settings. This is a mandatory effort if OIM and OIA instances are on separate environments.
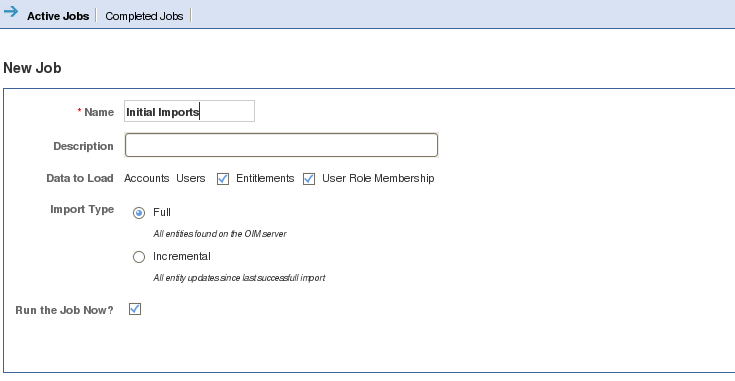
The next step will be to schedule an import job.
Go to Administation --> Import/Export --> Schedule Job
As this is your first effort, you need to click on
import Users, Accounts, User Role Memberships and Entitlements
Click on the newly created Oracle connection OIM SBX Connection and click next. Click on Load all resources defined in the system at the time the job is run and click Next Call the Job Name Initial imports and click Finish.

Once you have executed this, you can then go the the Identity Warehouse and determine what has been imported
COMMON ISSUE: xelsysadm, failed to be authenticated
After these steps, you may experience the following error: [Security:090304]Authentication Failed: User xelsysadm javax.security.auth.login.FailedLoginException: [Security:090302]Authentication Failed: User xelsysadm denied.
I double-checked the credentials by logging through the OIM GUI and design console though I was quick to realise this was not a UN/PW issue. It's likely that OIA is unable to locate the xellerate home directory and/or the authwl.conf file (probably because of server hardening, port restrictions, permissions on files etc).
The solution here will be to ensure you copy the config folder located at <OIMDesignConsole_home>/config path and paste it in the Oracle Identity Analytics $RBACX_HOME/xellerate folder.
Next will be to make alterations on the logging.
On line 41 within the
#RBACx IAM logging log4j.logger.com.vaau.rbacx.iam=DEBUG
Once you've saved the efforts, bounce the application server. for the order to take effect.
Try the same import procedure and then review the OIA logs (rbacx.log) to determine if you can firstly connect to OIM. You are looking for the line ********** Connection successful ********** within the logs to ensure this has connected. Alternatively, you may receive a ERROR [DBIAMSolution] Error connecting to OIM with a more defined detail.
Example Below:
15:34:48,835 DEBUG [OimUtilityFactory] ********** Connecting to OIM Server **********
15:34:49,330 DEBUG [OimUtilityFactory] ********** Connection successful **********
About the author
 Daniel is a Technical Manager with over 10 years of consulting expertise in the Identity and Access Management space.
Daniel has built from scratch this blog as well as technicalconfessions.com
Follow Daniel on twitter @nervouswiggles
Comments
Other Posts
AS I was migrating my environment into an S3 environment, I wanted to leverage off the SES services that AWS provide, more specifically, to leverage the off the SMTP functionality by sending an email via PHP
Read More...
The WeMos D1 is a ESP8266 WiFi based board is an extension to the current out-of-the-box library that comes with the Arduino installation. Because of this, you need to import in the libraries as well as acknowledging the specific board. This process is highly confusion with a number of different individuals talking about a number of different ways to integrate.
Read More...
NameID element must be present as part of the Subject in the Response message, please enable it in the IDP configuration.
Read More...
For what I see, there's not too many supportive documentations out there that will demonstrate how provision AD group membership with the ICF connector using OpenIDM. The use of the special ldapGroups attribute is not explained anywhere in the Integrators guides to to the date of this blog. This quick blog identifies the tasks required to provision AD group membership from OpenIDM to AD using the LDAP ICF connector. However this doesn't really explain what ldapGroups actually does and there's no real worked example of how to go from an Assignment to ldapGroups to an assigned group in AD. I wrote up a wiki article for my own reference: AD group memberships automatically to users This is just my view, others may disagree, but I think the implementation experience could be improved with some more documentation and a more detailed example here.
Read More...
In the past, the similar error occurred though for the Oracle Identity Management solution. invalidcredentialexception remote framework key is invalid Because they all share the ICF connector framework, the error/solution would be the same.
Read More...
org.forgerock.script.exception.ScriptCompilationException: missing ; before statement
Read More...
ForgeRock IDM - org.forgerock.script.exception.ScriptCompilationException: missing ; before statement
Read More...
When performing the attempt of a reconciliation from ForgeRock IDM to Active Directory, I would get the following error
Read More...
In the past, the similar error occurred though for the Oracle Identity Management solution. invalidcredentialexception remote framework key is invalid Because they all share the ICF connector framework, the error/solution would be the same.
Read More...
During the reconcilation from OpenIDM to the ICF google apps connector, the following error response would occur. ERROR Caused by com.google.api.client.auth.oauth2.TokenResponseException 400 Bad Request - invalid_grant
Read More...

